-
10 Yummy Plant-based Alternatives to Cow, Soy & Rice Milk!
Cow’s milk contains high levels of lactose and is 80 percent casein, which can cause bellyaches in kids with special needs and adults with belly sensitivities. Soy and rice milks are also considered foods that can worsen symptoms in people who are sensitive. Today, animals are pumped with growth hormones…
-
How to Make Homemade Mayo in 10 Minutes Flat!
Have 10 minutes a few simple ingredients? You can make homemade mayo! You’ll need: 1 large egg 1 1/2 teaspoons fresh lemon juice 1 teaspoon Dijon mustard (optional) 1/4 teaspoon salt 1/4 teaspoon white pepper 1 cup light extra virgin olive oil or a neutral-tasting oil Here’s how to make it:…
-
How to Make Homemade Ketchup (Trust me, It’s Easy)!
Stop buying that bottled stuff and try my DIY ketchup. It’s fast, fun and delicious! You’ll need: 1 large onion, chopped 1/2 cup red wine vinegar 1/3 cup brown sugar 1/2 teaspoon kosher salt 1/2 teaspoon freshly ground black pepper 1/4 – 1/2 teaspoon ground cumin 1/4 teaspoon ground allspice 2 garlic…
-
My Homemade Chicken Nuggets Are Better Than You Know Who’s!
My chicken nuggets are better than theirs! (You know who I’m talking about!) Yep, I said it. Just say no to fast food and make these in 30 minutes or less! You’ll need: 2 cups plain Greek yogurt or 2 cups homemade ranch dressing 1 teaspoon garlic powder 1 teaspoon paprika 1 teaspoon…
-
Decadent Chocolate Pound Cake!
This is not your Mama’s chocolate pound cake. You’ll need: 1/4 cup unsweetened Dutch-processed cocoa powder 1/4 cup boiling water 1 1/2 cups sifted cake flour 1 teaspoon baking powder 1/2 teaspoon kosher salt 1 cup unsalted butter, at room temperature 1 1/4 cups sugar 1 1/2 teaspoons pure vanilla…
-
How to Make Hibachi-Restaurant Style Rice at Home (I Cracked the Code)!
Love that rice you get at hibachi restaurants? Now you can make it at home! You’ll need: 4 cups day-old cooked brown or white rice 4 ounces butter, softened 1 onion large, diced 1 large carrot, peeled and roughly chopped 2 cloves whole garlic, mashed 2 cloves garlic, whole 4…
-
How to Make Chocolate Ganache Frosting Like a Pastry Chef!
To make homemade chocolate ganache like a pro, you’ll need: Chocolate, evenly chopped Heavy cream Here’s how you make it: Weigh out the amount of chocolate you need based on the ratio chart below. Chop in small even pieces. Measure the cream into a saucepan based on the ratio chart…
-

Boxed Cake Mix? No Way! How to Make an Easy, Delish DIY Yellow Cake Mix!
My easy homemade yellow cake mix doesn’t contain shelf stabilizers. Perfection! You’ll need: 1 1/2 cups organic flour 1 cup organic cane sugar 2 teaspoons baking soda 1/4 teaspoon kosher salt Combine all ingredients. It makes 2 1/2 cups of cake mix that will yield one 13×9-inch cake. Store it in…
-
How to Make Rich,Warm & Creamy Polenta – Viva La Italiana!
Creamy polenta is so heartwarming after a long day. Give it a try! You’ll need: 4 cups organic low-sodium chicken stock 1 cup medium-grain white polenta (yellow if you cannot find white) 1/2 cup sweet cream butter 1/4 cup ricotta or cream cheese 1/4 to 1/2 cups Parmesan cheese Here’s how…
-
How to Make Ragù Alla Bolognese (Italian Comfort Food at Its Finest)!
Ragù Alla Bolognese is ultimate Italian comfort food over pasta or polenta! You’ll need: 1/8 cup extra-virgin olive oil 3 tablespoons butter 1 carrot, finely diced 1 medium onion, diced 1 rib celery, finely diced 1 clove garlic, sliced 1/2 pound veal, ground 1/2 pound pork, ground 1/2 pound ground round…
-
How to Make a Balsamic Vinegar Reduction (& Why You Need It)!
A balsamic vinegar reduction is a snap to make! Just remember to measure at least 4 cups of balsamic vinegar. For a nice rich glaze, any amount of balsamic vinegar should be reduced down to one-fourth of what you began with. You’ll need: balsamic vinegar Here’s how to make it: In…
-
How to Make Peanut Butter & Carrot Dog Biscuits for Your Furry Friends!
Show your fur babies some love with these homemade dog biscuits! They deserve a healthy snack, too! You’ll need: 2 eggs 1 jar carrot baby food 2 tablespoons peanut butter 2 cups flour 1/2 cup cornmeal Here’s how to make them: Place all ingredients in a large bowl and mix until…
-
How to Make Homemade Mayonnaise in 10 Minutes Flat!
Have 10 minutes a few simple ingredients? You can make homemade mayo! You’ll need: 1 large egg 1 1/2 teaspoons fresh lemon juice 1 teaspoon Dijon mustard (optional) 1/4 teaspoon salt 1/4 teaspoon white pepper 1 cup light extra virgin olive oil or a neutral-tasting oil Here’s how to make…
-
How to Make My Family’s Secret Mac & Cheese Recipe in Less Than 30 Minutes!
Yes, my family has a secret macaroni and cheese recipe, but I’m sharing it with you! Cook once, eat twice! We sometimes eat it for breakfast too! You’ll need: 1 pound elbow macaroni 3 tablespoons olive oil 1/2 cup butter 1/2 cup flour 1 cup chicken or vegetable stock 1 1/2 cups…
-
How to Make Flavor-Packed Infused Oils in 10 Minutes (or Less)!
Flavored oils are a must for your pantry! And they’re so easy to make! You’ll need: 1 cup of your favorite oil 1-2 teaspoons of your favorite herbs or spices 8 garlic cloves, crushed Here’s how to make it: Heat the oil in a saucepan. Crush the garlic cloves directly into…
-
How to Make DIY Whole Wheat Pancake Mix (No Preservatives)!
After you try this homemade whole wheat pancake mix, you’ll never buy that box stuff again! You’ll need: 6 cups organic white whole wheat flour 1/3 cup organic cane sugar 1 tablespoon baking powder 2 teaspoons kosher salt Here’s how you make it: Combine all ingredients. Store in an…
-
Do You Know What rbST Is? If You Drink Milk, You Need to Read This!
Many “conventional” dairy farm cows can be treated with something called recombinant bovine somatotropin (aka rbST). This rbST is a GMO. It is a version of a naturally occurring hormone in milk-producing animals that stimulates production. Yes, it’s made in a lab. Today, many large corporate dairies inject rbST into…
-
How to Make DIY Mixed Berry Swirl Frozen Yogurt (You’ll Save Money)!
Going out for frozen yogurt with the whole family can really add up financially. Stay home and make your own! The kids will be so excited! You’ll need: 4 cups plain yogurt (whole or reduced-fat Greek yogurt 2%) 1 cup sugar or substitute, divided 1 tablespoon vanilla, lemon or almond extract…
-
How to Cook Bacon Like a Chef in 15 Minutes (Easy Cleanup)!
Pan frying bacon on the stove can be messy and full of splatters, which can be dangerous when you have littles roaming about. Try this professional chef technique that yields perfectly crisp bacon every time – and simplifies cleanup without skimping on flavor. Here’s how you do it: Line a…
-
Cada Cada Toast Is Healthy, Quick & Delish! (But What the Heck Is It?)
Psssst! Are you looking for a fast, cheap and easy snack? Me, too! How about my Cada Cada Toast made with sprouted grain bread, which is very high in protein? You’ll need: 2 Slices Ezekiel Whole Grain Sprouted Sesame Bread, toasted (or your favorite bread) 1 ripe succulent California avocado Fresh…
-
Dutch Baby Pancake in 30 Minutes? Sunday Brunch Made Easy (Gluten-Free Option, Too)!
The Dutchbaby Pancake was developed in the U.S., but it’s derived from the German Pfannkuchen. You’ll need: 4 large eggs 1 cup milk or almond milk 1 cup flour or gluten-free flour 1/4 cup sugar 1/2 teaspoon lemon zest 1/4 teaspoon salt 2 tablespoons unsalted butter 1 teaspoon vanilla 1…
-
How to Make Sweet Potato & Parsnip Mash (Weekday Easy, Holiday Worthy)!
This is a delicious seasonal side dish! Try it at your holiday gathering or just a mid-week family meal night! You’ll need: 2 pounds sweet potatoes, peeled and cut into 1/2- to 1-inch size chunks 1 pound parsnips, peeled and tough interior cores removed and cut into 1/2- to 1-inch chunks…
-
How Your Kids Can Grow Their Own Mushroom Farm (& Eat ‘Em, Too)!
One of my signature children’s cooking classes is called “Eat Your Own Biosphere.” It’s a fun, engaging class for kids and their families that teaches some science that surrounds food. Today, with the help of mail order from Far West Fungi Company in the San Francisco Bay Area, it is possible…
-
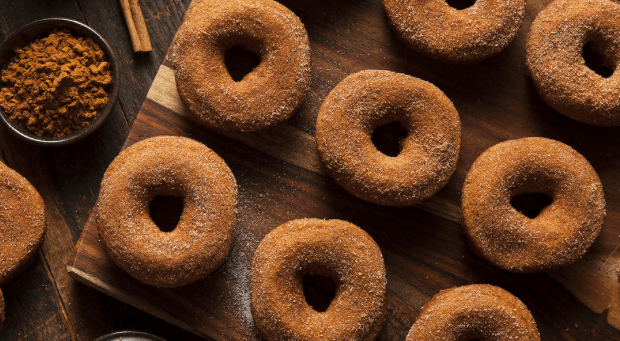
How to Make Vegan Pumpkin Doughnuts With Cinnamon-Sugar Dust!
Topped with cinnamon sugar, these vegan pumpkin doughnuts are super duper fluffy and the perfect way to ring in pumpkin season (aka fall)! You’ll need: 1 1/4 cups cake flour 1/2 cup light brown sugar, packed 1/2 teaspoon salt 1 teaspoon baking powder 1/4 cup canned or fresh pumpkin puree 1/4…
-
How to Make Mouillettes,the Ultimate French Comfort Food!
Mouillettes (pronounced moo-yet) are also known as “little soldiers” when they’re camouflaged with bacon, ham or a thin slice of salmon. They are little fingers of toasted bread that you dunk in a soft-boiled egg. It’s a classic French breakfast dating back to childhood for most. Warm, comforting, fun and delicious!…
-
PB &J Fans! Make Your Peanut Butter & Jelly Happier! After All… Isn’t it Time You Reciprocate?
Grill your peanut butter and jelly sandwich! If the warmth, the smell and the crunch isn’t enough to put you over the edge, I’ve added an enriched dough: delicious brioche. If you haven’t had a serious food crush lately, watch out! ( You can also see my recipe featured on #30Secondmom)…
-
Fire Up the Grill & Make Grilled Potato Salad With Lemon Vinaigrette!
This grilled potato salad recipe is a tangy twist on the classic! It’s perfect for your end of summer get-together! ( My recipe can also be found featured at #30SecondMom) You’ll need: 2 pounds medium-sized Yukon potatoes 1/4 cup scallions, thinly sliced 2 tablespoons minced fresh oregano, divided 1/4 cup minced…
-
Peanut Butter and Carrot Doggy Biscuits The Family Can Make at Home!
Show your fur babies some love with these homemade dog biscuits! They deserve a healthy snack, too! ( See my recipe also featured) on #30secondMom You’ll need: 2 eggs 1 jar carrot baby food 2 tablespoons peanut butter 2 cups flour 1/2 cup cornmeal Here’s how to make them: Place…
-
How to Make a Delicious Balsamic Vinegar Reduction & Why You Need This in Your Pantry.
A balsamic vinegar reduction is a snap to make! Just remember to measure at least 4 cups of balsamic vinegar. For a nice rich glaze, any amount of balsamic vinegar should be reduced down to one-fourth of what you began with. You can also see my recipe featured at #30SecondMom…
-
How to Win a Food Fight Battle Among Children With Autism Spectrum Disorder
I love this article . I originally shared this piece in April May issue of, The Autism File.An International digital Magazine for families of Autistic Children. This information is too valuable not to continue to share. My approach may also be used to conquer a Food Fight battle among many, not just…
-
Convenience Foods – The Disadvantages and How to Take Your Pantry Back!
Ahhh, the price we pay for convenience. Since the innovation of the T.V. dinner, there have been great advancements in food preparation. Unfortunately- today, well over half of the foods purchased in a typical American supermarket are either pre-packaged or pre-prepared. Before the innovation of fast food— food consisted of…
-
10 Things You Can Do if You’re Concerned About the Lack of Labeling on Genetically Engineered Foods.
Are you consuming Frankenfoods? Do You Even Know? ORIGIN: 1990’s- from Franken(stein) + food. Genetic engineering (GE),or genetic modification (GM) food involves the laboratory process of artificially inserting genes into the DNA of food crops or animals. The result is called a genetically engineered or genetically modified organism (GMO). Many…
-
Black Tie Optional, Popcorn Mandatory!
Tis’ the season! What? Parents, no time to watch the awards show? No worries! Set your DVR, roll out the red carpet, grab all your film-buff friends and their kids- and host the hottest playdate party of the year! Throw an awards party as an Oscar re-watch for the adults, and…
-
Think Outside The Bag… of Lettuce!
How does one make a healthier family lifestyle easier?-– is an answer I might die searching for. And some have. I do think there are alternative ways, other than using bag lettuces. As a working parent, I am always excited about purchasing something that can make life easier for anyone…
-
Why You Should be Chicken about Chicken!
I love to cook and eat chicken, but chicken is a potentially hazardous food if handled improperly. It even scares me. About one in four pieces of raw chicken carry salmonella. Salmonella from poultry sickens over 200,000 Americans a year, according to USDA food safety data. Chicken and the juices…
-
How to Parent with a New Years Eve Hangover
How to Parent with a New Years Eve Hangover! So, THIS HAPPENED- The kids had Noon Years Eve and you had New Years Eve! Finally, you scored a well needed reprieve – and a moment for you to have some much-needed adult-time! Not everyone indulges but if you do and…
-
What Tools… What Age?
Every parent wonders when their child is ready to start using kitchen cutters and peelers ! We all will have to address a child’s natural interest in the variety of shiny small wares we have in the drawer– because we use peelers, mashers, and cutters in our home kitchens…
-
10 easy suggestions to have a stress-free holiday with kids in the kitchen.
The Holidays are a usually filled with lots of opportunities to cook and bake. The kitchen is a terrific place to bond with children whether you’re planning to rustle up breakfast or decorating cookies. You can create memories that will last a lifetime. Many of us are busy, aware parents…
-
How to Encourage Good Eating Habits In Children
One of the most powerful ways to teach a child anything is to role model the behavior you want the child to display. If you want your children to grow into adults who enjoy a wide variety of nutritious foods– make sure they see you eating the foods you’d like…
-
Consequences of Developing Bad Eating Habits Early in Life
Obesity amongst children has become an epidemic in North America. The younger children start to develop healthy eating habits, the better off they will be. If you’ve discovered that the only thing your child will eat is a high fat, processed fast food and you give in because it’s better…
-
Sample Page from Learning with Little Lulu Lemon
Little Lulu is a fun hands on activity book for kids ages 3-7
-
Yukon Gold Mashed Potatos ~ Favorite Holiday Sides
It’s all in the Potato! Yukon Golds! Ingredients 3 pounds Yukon gold potatoes 2 teaspoons salt, divided 1/3 cup butter 1/3 cup half-and-half 4 ounces cream cheese, softened 3/4 teaspoon coarsely ground pepper Preparation 1. Peel, Boil & Drain. Peel potatoes, and cut into 1-inch pieces. Bring potatoes, 1 tsp.…
-
Day of The Dead Bread~The Legacy of Past Civilizations
As in many Latin American countries, Mexico commemorates the Day of the Dead or All Souls’ Day on November 1st and 2nd. It is meant to honor the legacy of past civilizations through people’s beliefs that death is a transition from one life to another in different levels where communication…
-
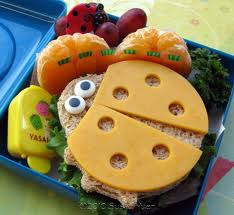
Retro Blog- The New American Lunch Box
Take a minute to reflect back… Remember when you were kid? Now, try to conjure up this specific childhood memory – your wonderful lunch box! You were cool, fun, and felt confident sporting this brand new piece of gear. This box and what it was filled with often reflected who you…
-
Last Days of Grilling – Repeating Our Favorite Recipe- Grilled Popcorn Halibut!
Grilled Popcorn Halibut Ingredients: 4 (6-ounce) skin-on halibut fillets Canolia oil 1/8 c cooked but unpopped popcorn kernels ( the ones that didn’t pop ; from your last batch of popcorn 1/2 c fresh popped popcorn lemon parsley compound butter ( see recipe below) * Avoid Atlantic halibut, which is overfished;…
-
BBQ Worm Sandwich or Sand “witch” – how we like to call it!!
Ingredients: 8 Turkey hot dogs, each cut lengthwise into 6 thin strips 1/2 Cup Homemade barbecue sauce ( see recipe below) 8 Slices (optional) Real cheddar cheese 8 Sandwich buns, split, toasted Method: In 10-inch nonstick skillet, heat hot dog strips over medium-high heat until strips begin to…
-
8 Things You Can Do To Avoid Frankestein Foods
We know it’s that time of year… Halloween! We love spooky, oeey, gooey things… But we really don’t want them in our bodies nor do we want to reflect back in twenty years and realize …. we really are what we eat…………… today! This post will provide you a brief outline of what…
-
Kids Culinary Adventures to release “Chefs First Activity Book”
As professional chefs we begin with safety first! This entertaining and educational book provides hours of fun. Small children will safely identify kitchen tools through a color, cut and paste activity which is a great introduction to everyday kitchen utensils. This fun engaging book comes with a small recyclable card board “toolbox” to carry their culinary items. Just like…
-
Camp Green Eggs And Ham
Camp Green Eggs and Ham! Chef Natalie and her students washing up then making some yummy schlotz knotz. Posted using BlogPress from my mobile iPhone office
-
Fun in the kitchen!
Our chefs at Kids Culinary Adventures alway cook up fun and great memories in the kitchen. Here are some pictures of our staff and students in action. – Posted using BlogPress from my mobile iPhone office
-
Kids Culinary Adventures’s Blog!~ “In the Mix!”
Bon Appetit! Welcome to the new Kids Culinary Adventures blog, the official source for information, insight, and updates about Kids Culinary Adventures , and really super kewl food stuff! Kids Culinary Adventures aka known as “KCA”, is made up of a few of passionate food enthusiasts and professional culinary experts who…
-
Subscribe
Subscribed
Already have a WordPress.com account? Log in now.
