 Tis’ the season. If your garden is abundant with beautiful sun kissed tomatoes— you have plans. Fresh, homegrown garden tomatoes are so delicious, and carry a depth of flavor. If you grow your own, most-likely, you are busy making sauce or canning whole, gift giving your neighbors, and of course— noshing your harvest.
Regardless of the variety, you can also learn to make sun-dried tomatoes. The added value of going at it yourself is not just for flavor and freshness. The savings alone could be a motive to DIY. Commercially packed sun-dried tomatoes justify a hefty coin. These luscious nuggets of summer can be packed in olive oil, elaborately seasoned with herbs and spices— or left ordinary. When you make your own, it’s almost like awaking a deeper intense tomato profile in the fruit. Sun-dried tomatoes will always make a great pantry addition, certainly no doubt they are good to have on hand. Processing is incredibly easy, and requires no special equipment- so lets get started.
Ingredients:
10 lbs. of your favorite farm fresh tomatoes, cleaned, sliced into 1/4 inch thick slices, seeds removed, skin in tack. (optional)
Good quality olive oil
Garlic, fresh, peeled and left whole ( optional )
Fresh or dried herbs, cleaned and picked over
Dried spices of your choice
Things You Need to Know:
Not all tomatoes are created equal. Different crops will dry out at different speeds. Never expect your crops to finish at the same time. This is due to the individuality of each plants variety, and the individual tomatoes moisture content. A great way to tell when your tomato has completed its very own dry time— is simply to just pick it up. Bend it. If the tomato is firm to the touch,—very dry, but still pliable when bent— it is ready to package. Prior to storage, the tomatoes texture should be like that of a dried apricot. If dried too long, they become tough and leathery. Also keep in mind, If they are not dried long enough; they will harvest mold. if you feel unsure you can avoid any funky fungus growth if you pack your friend tomato prices in good quality olive oil.
When drying your tomatoes, pull them for storage individually. Remember, they all dry at their own speed. If you are worried about the level of dry— just pull them off the drying rack, and pack in oil before they are too tough.
Here’s How to Get Started:
Some people like to remove the core first. It is optional. With the tip of your paring knife angled at 45’ degrees, plunge a 1/4 inch just around the outside core of the tomato. Saw a circle around the core deep, about 1/2 inch. Pull the core out like removing a cylinder shaped plug— discard the white pith you pill along with the green butter rough portion when the stem meets the fruit. At the same time, inspect the fruit for any tough, dried portions and remove any bruised or soft parts.
Once the tomato has been cored, cleaned for bruises or soft spots—cut the tomatoes into halves. Cut the halves in half, revealing quarters. Cut the quarters again into halves revealing eighths. All lengthwise. Remove any seeds that are visible. These portions will shrink to 1/4 of their original size and remain meaty. This is a great culinary math project for children if you are so incline to include a little person in your food preparations. You can also slice the tomato horizontally, which will result in less meaty product.
Ten pounds of tomatoes, will yield approximately 4 cups of dried fruit.
The Drying Process:
Oven Dry:
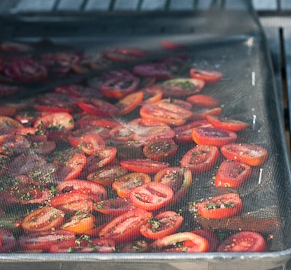
Preheat the oven to 150’ degrees fahrenheit. Anything less will help bacteria growth, so regardless what anyone tells you— don’t lower the temp. On a parchment or silicone lined baking sheet, place a cookie cooling rack or screen on top. Lay the cut tomato slices on the drying rack in rows. Make sure there is ample space between each slice. This will help with air circulation. If you do not have the tomatoes up on a rack, you will need to flip them during the process. Sprinkle the slices with sea salt. Add optional flavoring by adding fresh cracked pepper and dried herbs. Italian seasoning, thyme or oregano on it’s own are all commonly used. Dry until all moisture is evaporated. This could take all day. Dry with oven door shut for 10-24 hours. Rotate the baking sheets onto different racks occasionally during the dry process.
Food Dehydrators:
There are several ways to dry tomatoes. Choose what best fits your lifestyle. A food dehydrator with adjustable temperature controls, and a timer are best. Using a dehydrator seem to yield the most consistent results. Also, it is the easiest. Because it is designed to eliminate hydration, these machines will achieve the best yields. Follow manufactures directions.
The Hot Sun:
Lay the cut tomato slices on drying racks, onto a baking sheet of you do not have a drying screen. Make sure there is ample space between each slice. If you do not have the tomatoes up on a rack, you will need to flip them during the process. Sprinkle the slices with sea salt. Add optional flavoring. Cover slices loosely with a cheesecloth to keep any potential for bugs or dust coming in contact with your crops. It’s best to begin in the morning and allow the process go until sunset. It may take 2-3 days depending on the temperature and the humidity in your geographical area, the water content of the tomatoes, the thickness of the slices, and how well the air is able to circulate around them. Remember to bring the tomatoes in the house overnight. When complete, tomatoes should be flexible, like a fresh raisin. You should be able to describe them as wrinkled with a deep reddish color.
Then the tomato are ready, remove from drying area and allow cool to room temperature about 30-60 minutes. Store air tight packed in oil, garlic and herbs— or left dry. The freezer is best, there the dried tomatoes will retain their color and flavor for about 9 to 12 months. A fridge is ok for a few weeks, but if there is mostly moisture left in them, they WILL start to get moldy in a month or so. A vacuum sealer will help to increase the longevity of dried tomatoes in the fridge. Dried tomatoes not packed in oil will quickly reabsorb moisture. Make sure your containers are airtight.
Be sure to spot check your newly packaged dried tomatoes every day for about a week. Make sure there are no signs of condensation in the containers. If you see any moisture, remove the tomatoes immediately, place them back in the food dryer and resume the drying process.
If you like to have your dried tomatoes in a seasoned oil, such as olive oil with basil, thyme, oregano and/or minced or powdered garlic or garlic salt, it is best to do this when you are ready to eat them, or shortly before, and refrigerate them. There aren’t many university studies about the safety of home-dried tomatoes packed in oil, but the information that’s available suggests that it is best to just do that as you use them or make up small batches and refrigerate them up to a few hours like you would marinate other foods.
Sun Dried Tomato Pesto
Love. love , love Sun Dried Tomato Pesto. Almost my favorite think in the world to eat. So flavorful and bright. The best part about it, other than it’s flavor — is that you can smother it all over other foods. Serious flavor layering. I LOVE the marriage with cream cheese or domestic goat cheese- mixed together well and spread thick on a toasted bagel, then piled high with fresh cut cucumbers, a fresh tomato slice, red leaf lettuce some mic greens. Now that’s hot! I also love to toss my sun dried tomato pesto on freshly cooked pasta for a quick robust pasta dinner. And lastly, coming in a close third— I love to slather this pesto on a garlic rubbed, toasted baguette. A quick cocktail bruschetta.
With a jar of this pesto in your panty— you will alway be flavor ready! Enjoy.
Ingredients For Sun Dried Tomato Pesto:
1 cup of sun dried tomatoes in olive oil (do not drain)
2-4 cloves garlic, cleaned and root removed
1/2 cup fresh basil leaves, packed ( optional )
1/2 cup flat leaf Italian parsley, packed
1 cup freshly grated parmesan
1/4 teaspoon salt
1/4 teaspoon black pepper
1/4 teaspoon red chili flakes ( optional )
Good quality olive oil
Here’s How :
Add all the ingredients except the cheese and the oil to the bowl of your food processor or standing blender.
Pulse about 2-3 minutes until a paste begins to form and a hearty consistency is achieved. Pesto is not meant to be smooth—don’t over process.
Remove the lid and add the cheese. Pulse an additional 30 seconds to an additional minute to blend. Check the consistency. Add additional olive oil if you prefer a more liquid consistency.
Taste and adjust seasoning with salt and pepper.
Store in clean glass mason jars and keep refrigerated until needed. Keeps fresh for about 7-10 days in the refrigerator.
Makes approximately 2 cups


Leave a comment